Mushroom jerky is gaining a lot of traction in the jerky world as a plant-based alternative. We love all things jerky—not just beef jerky—so we wanted to give it a try.
After cooking up a few batches and fine tuning the best mushroom jerky recipe possible, we’re happy to say, mushroom jerky rocks!

Mushroom jerky is a jerky alternative that shares many of the best parts of beef jerky such as texture, flavor, nutrition and portability.
Mushroom jerky is a healthy snack full of vitamins, minerals, antioxidants, and dietary fiber. Key nutrients include Vitamin C, Vitamin D, B vitamins, potassium, choline, riboflavin, niacin, and pantothenic acid. There are many health benefits to eating mushrooms.
Mushrooms boast a rich, umami flavor profile that echoes the meaty flavor of beef jerky. Plus, mushrooms are like sponges. They soak up the flavors of the marinade and pack a tasty punch.
This recipe creates a vegan jerky that is smoky, slightly spicy, and vinegary. The mushrooms remain pretty chewy which we really enjoyed. It’s a snacking experience that will keep you coming back for more. Plus, it’s easy to make.
Before getting to the recipe, here are a few important things to keep in mind when making homemade mushroom jerky.
Selecting the Right Mushrooms

There’s a wide variety of mushrooms out there to choose from when making mushroom jerky. The most popular mushrooms used for mushroom jerky are Portobello Mushrooms, Shiitake Mushrooms, Oyster Mushrooms, and King Oyster Mushrooms.
All of these mushrooms share a few characteristics that make them a good fit for jerky.
First, they all are larger sized mushrooms which make them easy to prep and slice. Larger mushrooms are also important because the cooking process will shrink the mushrooms by about 30-50%. You don’t want to be left with tiny, little pieces after all your hard work.
Secondly, these mushrooms have a distinct flavor that really shines in the finished product. These aren’t your water-logged, flavorless mushrooms. These are packed with flavor.
Prepping the Mushrooms

There’s a lot of debate out there on the proper way to wash mushrooms (including if you should wash them at all).
Mushroom traditionalists say to never wash mushrooms, only brush them or wipe them with a paper towel because they’ll absorb water and become waterlogged.
Here’s the truth. Mushrooms are over 90% water and don’t absorb very much water unless they are soaked in water for an extended period of time.
The key is give mushrooms a shower, not a bath.
So to clean your mushrooms, plunge them in a bowl of cold water. Mix them gently with your hands, removing as much dirt as possible. You’ll see the dirt slowly fall to the bottom of the bowl. After a few turns, remove them to a clean towel and gently pat dry.
That’s it, you’re good to go! Clean mushrooms ready for jerky!
Using the Stems and Caps

Most mushroom recipes will have you discard the stems and only use the caps.
This is because mushroom stems tend to be woody with a slightly tougher texture. When making mushroom jerky, this is less of a concern because of the cooking and drying process. In fact, the goal with mushroom jerky is to create a tougher, chewier texture to mimic beef jerky.
Plus, less waste all around, which is a win-win.
It’s still a good idea to trim off and discard the very bottom of the mushroom stem and any dry ends. We want something with a nice bite, not an endless chew.
Slicing Versus Tearing
We tried two different methods for breaking down the mushrooms: slicing and tearing. Both methods have their advantages and disadvantages. Slicing takes a little longer and creates cleaner, more even cuts, where tearing is easier and creates rougher, more irregular cuts.
We prefer the tearing method for a few reasons.
The more irregular sizes and shapes that you get from tearing mimic the look and texture of beef jerky.
Tearing also creates rouge edges as well as nooks and crannies that can absorb the marinade better, creating a more delicious bite.
Plus, tearing mushrooms is way more fun. But either way, torn mushrooms or sliced mushrooms will work great in this recipe.
Mushroom Jerky Ingredients
Mushrooms are highly absorbant and soak up the flavors of the marinade really well. You can be creative with the different flavor profiles. It's an incredibly versatile snack.
Generally speaking, we recommend keeping a few key elements: acid, fat, salt, heat, and a touch of sweetness.
An acidic ingredient will bring freshness and brightness to the marinade. Apple cider vinegar, rice wine vinegar, or lemon juice are great options.
You want to bring an oil into the mix to bring a little fatness and texture to the marinade. It will also bring everything together. Some good options include grape seed oil, olive oil, or sesame oil.
Salt is an essential ingredient in all cooking and a mushroom jerky recipe is not different. You can get salt from a variety of sources but the most common are sea salt, kosher salt, soy sauce, tamari soy sauce, liquid smoke or worcestershire sauce.
Don't forget a kiss of sweetness. We like brown sugar, maple syrup, or honey.
The remaining ingredients are up to you! You can use organic ingredients or other specific ingredients to make the mushroom jerky gluten free, paleo friendly, dairy free.
Plastic Bag or Bowl for Marination

You have two great options to marinade the mushrooms. You can either marinate them in a bowl or a plastic bag.
A bowl is the more environmentally-friendly option, but a zip lock bag will allow you to remove oxygen from the bag and help the marinade really penetrate the mushrooms. Both options will work, it’s up to your personal preference.
In terms of time, we recommend letting the mushrooms marinate for a full 24 hours. Ideally, you can marinate overnight.
If you’re crunched for time, a minimum of 30 minutes will also do the trick. Do not marinate for longer than 24 hours as the marinade will begin to break down the mushrooms and cause them to get mushy.
Cooking the Mushrooms

Just like beef jerky, there are no two mushrooms that are exactly the same. As such, the cook times will vary depending on the amount of mushrooms, thickness, and desired finished texture.
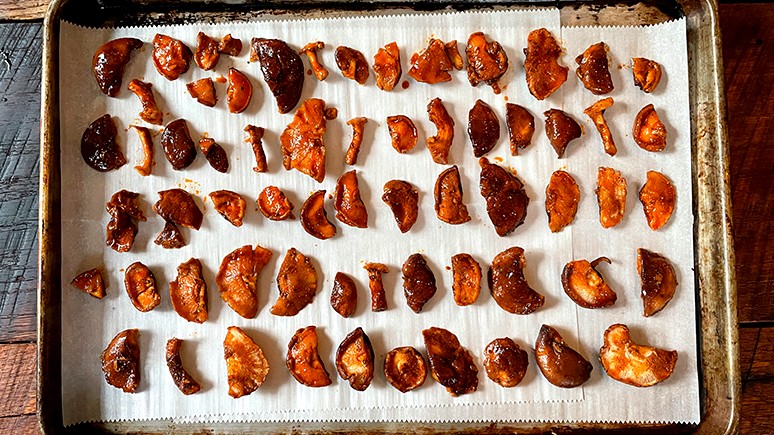
Make sure to spread the mushrooms in a single layer so the cook evenly.
We recommend starting with a 2 hour cook time and flipping the mushrooms halfway through. You can easily increase or decrease the cook time based on your preferences. The total time will vary for each batch.
Want a soft mushroom jerky? Cook them for less. Looking for a crunchy mushroom jerky? Let them go for longer.
This recipe has been written for an oven, but you can easily use a dehydrator. Just follow the instructions of your particular device.
How to Store Mushroom Jerky
This mushroom jerky recipe is so delicious, good luck having any leftovers to save.
In the rare case you have some extras from your batch, the best place to store cooked mushroom jerky is in a resealable plastic bag in the pantry. You are looking for a cool, dry place out of any direct sunlight. Cooked mushroom jerky will keep for a few weeks. The key is an airtight container.
If you plan to keep it any longer than that, we recommend storing them in the refrigerator. We wouldn’t recommend keeping them for any longer than a month.
Now you’re ready to make your very own mushroom jerky! Get ready for great taste, good spice and heat, and a great chewy texture.