With a few professional tips and tricks, such as chilling the meat and using a sharp knife, you can slice meat to yield a jerky with consistent thickness and the perfect chew.
Consistent thickness is the name of the game when it comes to jerky slicing. Slicing your jerky evenly will ensure that each piece cooks and dries at the same rate. This prevents over-drying and under-drying.
We recommend slicing meat for jerky at a thickness between 1/8" and 1/4" with the perfect thickness at 3/16”.
How do you like your jerky? Tough and chewy or soft and fall-part? Cutting with the grain yields a jerky with a tougher, more traditional chew. Cutting against the grain creates a jerky that is softer, and easier to chew.
Keep reading to learn more about slicing and the grain in meat, plus other insider tips that will help you slice your jerky like the professionals.
We’ve been making commercial beef jerky for over 90+ years and four generations. These insights and lessons have been passed down from generation-to-generation and we’re excited to share them with you.
Still looking for the best cut of meat for beef jerky? Click to read our comprehensive guide to the Best Cuts of Meat for Beef Jerky.
Let’s dive into the 5 simple but effective steps to slice meat for jerky.
Step #1 - Chill Your Meat in the Freezer
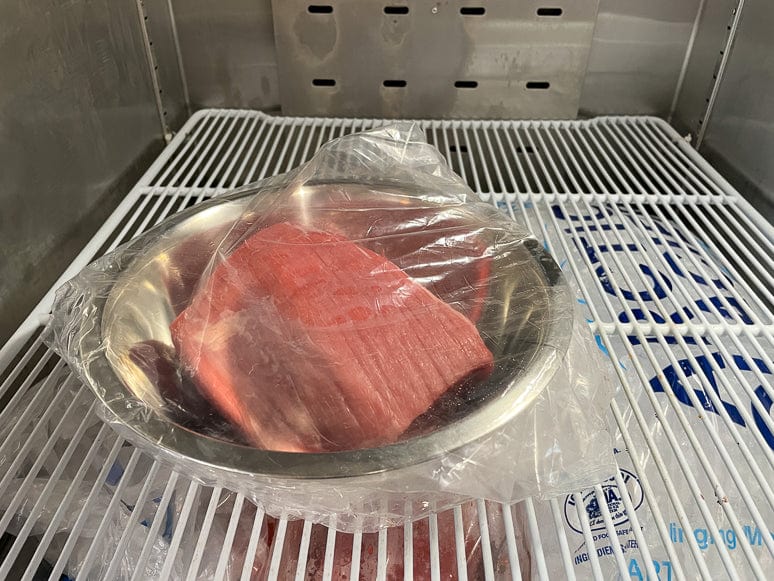
Before you even pick up a knife, the first step is to chill the meat to make it easier to handle.
Cover with plastic wrap and place your meat in the freezer until it's firm, but not frozen.
Anything less than almost-frozen or very cold meat can be difficult to slice. Room temperature meat is wobbly, wiggly, and unwieldy. A firm, cold piece of meat is easier to slice, especially when you’re aiming for thin, even slices.
You shouldn’t actually freeze the meat. The meat should stay in the freezer until just chilled and firmed. The time will depend on the temperature of the meat and freezer. Check the meat after 30 minutes. It’s not unusual to leave it in the freezer for upwards of an hour depending on your starting temperature.
Take advantage of the chilling time to prep all your ingredients and equipment.
Step #2 - Trim External Fat

Once the meat has been chilled and firm to the touch, it’s time to trim the external fat.
One of the beautiful parts of working with natural ingredients when making jerky is the lack of uniformity. Every cut of meat is going to be different. That’s what makes it challenging and fun.
The amount of external fat will depend on the type of cut of meat. Some protein sources and cuts have more external fat than others.
For example, a venison loin is extremely lean as compared to a beef brisket flat that has a thick fat cap. Regardless of the fat content, always make sure to remove as much external fat as possible.
The goal is to clean as much fat as possible without cutting into the lean meat. Don’t worry if there’s some fat remaining as most of it will render out during the cooking process. Plus, you can always trim the fat after the cooking and drying stage.
Pro Tip: Always work with a sharp knife. It may seem counterintuitive, but a dull knife will result in more accidents. You should never have to force a knife. You can let the knife do the work when it’s properly sharpened.
Victorinox is a great option for a variety of jerky slicing needs.
Step #3 - Trim Down Larger Cuts into Smaller Pieces

Before we start slicing the strips, you might need to cut down large pieces of meat to a more manageable size before the final slicing step.
This will depend on the type of cut you select. A Top Round will require multiple sizing cuts to get to the final stage. When slicing an eye of round, on the other hand, you can skip right to the strip slicing step.
Step #4 - Pick with the Grain or Against the Grain

At this stage, you have to make the decision to cut with the grain or against the grain.
What is the grain? The grain in a piece of meat refers to the direction that the muscle fibers run. You can see the grain by the streaks that run through meat, often accentuated by white strips of marbling.
Slicing with the grain yields a chewier, tougher jerky that retains slightly more moisture in the long muscle fibers.

Slicing against the grain yields a less chewy, softer jerky that loses slightly more moisture in the shorter muscle fibers than jerky cut with the grain.

Quick Guide to Slicing Meat and Grain
|
Cut |
Muscle Fibers |
Size |
Style of Jerky |
Moisture |
|
Against the Grain |
Short, broken-down muscle fibers |
Shorter, wider pieces |
Less chewy, softer |
Slightly less moisture through loss in short fibers |
|
With the Grain |
Long, tougher muscle fibers |
Longer, skinnier pieces |
Chewier, tougher, more traditional |
Slightly more moisture retained through long fibers |
Step #5 - Slice The Final Strips

Now it’s time to slice the meat into the final strips.
Secure the piece of meat with your non-dominant hand. With long, even strokes, slice the meat to your desired thickness.
The most important part of the slicing step is achieving an even thickness of the meat. We recommend 1/8” and 1/4” thick, with the goal of 3/16”. The thicker the slices of meat, the longer it will take to cook.
Our recipes and cook times are all based on jerky with a thickness within this range.
It’s always a good idea to use Cut Resistant Stainless Steel Wire Metal Butcher Gloves when working with sharp knives. These will prevent any injury to your hand in case of slippage.
Extra Tips
Don’t forget, practice makes perfect and jerky is very forgiving.
Looking to make the process more efficient? You can ask your butcher to slice the jerky to your desired thickness. This will result in perfect, equal cuts without the legwork of slicing. Don’t worry, we’ll still respect you for taking this shortcut. Work smarter, not harder, right?
Are you processing larger amounts of jerky at home and looking to automate the process? Check out our review of the Best Jerky Slicers for the amateur jerky maker.
Bottom Line
You don’t need advanced knife skills or fancy tools to slice meat for jerky. With a little prep work and planning, you can slice your jerky to the perfect thickness.
Try slicing both with the grain and against the grain to see which texture you prefer.
Want to know how long to marinate jerky? We conducted an extensive experiment to answer the question once and for all. The answer might surprise you. Learn more about How to Marinate Meat for Beef Jerky.
Looking to spice up your jerky making game? Check out our Beef Jerky Seasoning Blends (Coming Soon! Sign-Up For Early Access). We conducted hundreds of test batches to find the perfect all-in-one jerky seasonings. If you’re a serious jerky maker or even an amateur, you have to try these seasonings.
